Saturday, 5 November 2011

Shutter control on Bonfire Night

I was invited this weekend to my next door neighbours for a bonfire party, so I went prepared with my Nikon D3100 camera the standard lens and my tripod in the hope I might get a few pictures of use to show examples of using my cameras bulb setting . The bulb setting is simply a function that allows the user to determine the amount the shutter is open by manually depressing the shutter release button holding it, then when you think you are ready you let go to shut the shutter, easy or so I thought. This function is best used with a release cable or remote control so as to reduce image blur but not having neither I used my tripod to aid as would need the camera as steady as possible to minimise any blur. I then set the lens to it's widest f stop to allow as much light in as possible and the ISO to 200 and attempted a few shots all in manual focus .At first I found it quite difficult to determine how long to open the shutter but after a little while I got the feel for it and was quite pleased with my efforts . I hadn't appriciated how difficult this shoot would be as your never too sure where the rocket will explode and then when to open and shut the shutter.
Health and Safety played a big part in this shoot , I had to make sure that my self and my equipment did not cause any hazards to any of the other guests and that I my self was a safe distance from them and the fire works. I set my tripod about 6 ft away from the other guests and about 20 ft from the fire works and started taking a few pictures.


,
There were two main difficulties with taking pictures of fireworks,  firstly every firework had a different brightness  so was very difficult to determine how long to have the shutter open . And secondly with the rockets your never to sure were they will expole . I'd been given some advise about taking shots of fire works , one to stand well back so to get the whole image of the firework and to open the shuter as soon as it exploded until it faded away. Both easier said then done. The two image above are my favorites ones the first one because it give the sense of the excitement and danger involved for bonfire nights , with the fireworks falling to the ground and the smoke filled air , your never too sure what will happen next . The second one is slighty closer up so the fire comes more into detail , you can see the sparks from it spitting out with the firework in the back ground the firework lighting up the sence.    


This first and last shots to me are the best of the night, you really get the feeling of being a child again seeing all the smoke drifting away and the fire work lighting up the sky as it explodes .  I managed to positon my camera so the firework exploded in the centre of the picture on both images . Now looking back at what I'd do diffently next time I think I would experiment more with the ISOsetting and opt for a smaller aperture to try to get a sharper image.

Friday, 4 November 2011

Portrait Photography , Mary Ellen Mark

"I'm just interested in people on the edges. I feel an affinity for people who haven't had the best breaks in society. What I want to do more than anything is acknowledge their existence".

A quote from Mark in 1987, to me this shows someone who has real empathy for other peoples trouble and lives and wishes to show this through their photographs.

Mary Ellen Mark is a American photographer born in the 1940's. She initially attended the University of Pennsylvania and received a degree in Painting and Art History . She then moved onto photojournalism and received a masters degree for the University of the Annenberg School for Communication in 1964 . Her real break came from the Fulbright Scholarship she won in 1965 from which she was able to travel to Europe . After her travels she moved to NewYork and this is when her career really started,  she firstly worked for movie studios taking still shots for advertisement purposes . Then she moved onto magazines such as Time, Rolling Stone and Vanity fair.

 Her style is one of realism in such that she gives us images of real people in their environments. Marks photographs are mainly shot in black and white this gives a gritty feeling to them and helps to show the subjects lives as they are I feel with them being in colour this would distract from the message being portrayed. Mary Ellen Mark uses lines interestingly, framing in some of her images is in a unconventional manner,  which I enjoy a lot. A lot of her photographs will have the back ground unlevel , for example the picture below shows a child in a house. He is leaning against I think a washer or fridge and he looks to be upright but then as you start to look around the scene you notice that the cupboard is far from level which leads you to the window being on the same angle. All this leads to real sence of seeing the scene as it is was pictured. As in real life none of us see thing on a level perspective as we are always tilting our heads when looking at scenes of people and objects . The child's head is the focal point in this picture which is really very well thought out as with the back ground being unlevel the viewers eye spirals out round and around the shot.To the bottom left you can see a picture of my daughter


"What's interesting is letting people tell you about themselves in the picture"


Shutter speed 1/200sec , ISO 200 , f4 , 18mm focal length.


Below we see a scene taken in a classroom in Kiev , Ukraine USSR in 1987 . What makes this image interesting is that again we have the focal point being the girls face in the middle but for me it's the girls hands that make the picture. The girl in the left of the shot shows a with the position of her hand a feeling of warmth openness to her two friends , also how the arm is laid on the table leads us to the next area of the photograph . Here we find the other girls one looking directly into the lens the other looking out over the room. This images works because the girls expression in the middle of the picture is a great example of someone who really just doesn't want to be where she is . You can imagine, unlike the other two girls in the shot, that she would at any point just leave and the other two just left wondering...

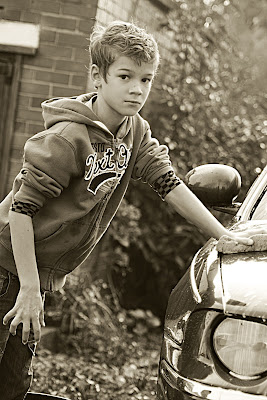
Here I have taken a few pictures of my son whilst he was washing my car . A job he usually enjoys but not on this occasion. I had told him I'd be taking some pictures of him while he worked and had told him when he was asked to look at the camera not to smile. The pictures worked out quite well , eventually as he found it difficult not to show even the smallest smile. I was trying to portray an image of a boy wanting to be somewhere else, any where but not having to wash his Dad's car . I used my Nikon D3100 camera but on this occasion I tried out my new Tamron 70 - 300 lens. I took these without my tripod but lent against a tree and a car to help keep stable. The first image works really well as by asking  my son to lean in against the car I was able to tilt the camera to get the wall in for background , my son and the car all at roughly the same angle but didn't show quite the right expression  . The second image below shows my son with a better expression. In this shot he really looks fed up with it all which he was.
 Shutter Speed 1/125sec , ISO 100 , f4 , 92mm focal length


Again here I used my new Tamron lens the 70-300mm Telephoto. By time I took this one my son was genuinely fed up with me taking his picture and washing my car. The above picture is a bit fake looking. This time I used a brick wall to help me keep stable which did seem to work . On reflection I would have been better using my tripod but my subject was not in the best of moods as you can see so opted for the quicker option. These of course started out in colour and have been changed to B&W . By doing this I feel it has aided in helping to portray a feeling of boredom which was present at the time.

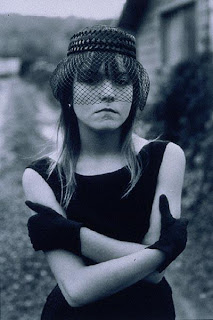
This image below has had the contrast decreased and slightly lightened which I feel gives it a good comparison to Mark's shot of the girl to the right . In the two shots both subjects are directly looking into the cameras lens both giving a message in their expressions. In the girls eyes I can see a message of although being in a run down area and with the little girl behind her and she is having to wear dirty clothes and shoes she portrays to me felling of contempt for her surroundings and that she will escape this place. My son too is wishing he was else were . The image of the girls looks to be little underexposed as detail is lost in the darker areas. I feel my picture shows greater detail . Shown below is the same image but with a slight tint and kept to it's original size.

Shutter Speed 1/160sec , ISO 100 , f4 , 85mm focal length


Health & Safety

These images were taken whilst my car was being washed and with my children running around so with this in mind I deceided not use my tripod as this would create an extra tip hazard as there was already a hose being used so didn't want any more hazards for my children and myself to trip on. I also spoke about not hosing me as is a usual event when washing my car as this could damage my equipment. I told my other children to stand by the house whilst taking the shots so not to cause any hazards.

Thursday, 3 November 2011

Joe Cornish

Joe Cornish has been taking pictures for well over 30 years and has established himself as one our most sort after landscape photographers  He was born in Exeter but now resides in North Yorkshire where he has based his studio, from here he and some friends not only produce his images but also hold workshops in photography and post production. He studied at Art at Reading University and was there that he became interested in photography.
In 1980 after graduating he worked as an assistant photographer in both London and Washington DC. His big break came in 1985 in the form of his travel photography; he was accepted into Charlie Waite's photolibrary for his landscape pictures. This then led onto over a decade of supplying his images to over thirty travel books, some of which only used his images in their publication .This was to be the making of Joe’s career as it  led onto him being a well established landscape photographer. So much so, he was in 1991, invited to be the Raleigh expedition photographer for their event in Alaska. After this he moved onto supplying the National Trust with his images and continue to do so upto this day .


Above are two images, the top being Cornish's followed by mine , his taken in the North York moors as in comparison with mine which was taken in one of the most southern point of England , Lands End. I'm not sure which format was used by Joe on this occasion but certainly a wide angled lens was used . I did not attempt to re create this image but to produce one to give similar feel to it . Both have you imaging your self standing in the image with texture of the ground being in the foregound then as you look up all is in focus as far as you can see. Joe's image is a recent one so may have been taken with his 39mega pixel digital back a Phase One P-45+ attached to a Linhof Techno field camera. This enables him to still work with the large format camera he is used to but have the all flexibility of the digital camera as well. I had planned to vistit Lizard Point with the intent of capturing the sunrise and surrounding countryside . This image was taken after the sun had risen at 08.37 but had left the camrea set at ISO of 400 which I'd used for the sun rise an hour earlier but had still had to use a shutter speed of 1 second to cope with the emerging  light compounded as well as I wanted to use a small apature, f22, to help keep the background in focus. We arrived at Lizards Point at around 0630hrs to give us time to set up and find a suitable postions to use.At this point it was still dark so had to take extra cae under foot to ensure our safety came fisrt as we were quite close to cliffs over looking the sea. For this image I used my Nikon D3100 with its kit lens which I set to its widest at 18mm and my tripod which was essential due to the slow shutter speed . Looking at mine in comparison you can see that it was taken too early in the day I have had to process my image to get the desired effect also after looking on my home computer I have spotted that my focus point is to near the fore gound , having a focus point perhaps around the 2/3rds up the picture may have helped to have a better balanced image where as it is the back ground is out of focus in comparrison to Joe's which stays focused to the top of the image.

The next two images show mine at the top and Cornish's below. My image was taken also in Cornwall in a village called Porthleven. On this occasion I haven't post proccesed my image. This was taken in the morning so the sun was over the sea by then , to get this image I had spent a little time trying to find some larger rocks as can be seen in Cornish's but had to do with was available . As this was taken from ground level so having to rest the camera directly onto the pebbles it took quite a few shots before I was pleased with the result to use as a comparrison. I used my Nikon D3100 with it's standard lens and set it to it's smallest apature to capture as much detail as possible and used 100 ISO and a shutter speed of 1/20th . With Cornish's shot you get a real feelng of  texture to it, with the stones in the foreground giving a gritty and cold feeling to the scene. Then the sence of how time is working with nature on the beach together to be able to create such a beautiful  landscape.


Here are a few links to help understand how Joe works,


http://www.phaseone.com/
http://www.joecornishgallery.co.uk/
http://www.robertwhite.co.uk/product.asp?P_ID=1190&P=SW612
http://www.directdigitalimaging.com/product/linhof/Linhof%20Teckno%20Field%20Camera/34


Monday, 17 October 2011

Child Life...


The image to the bottom right was taken with the intention of capturing my daughters joy of playing with in the woods with the leaves. I was attempting to show the leaves sharp and frozen but due to poor light was unable to use a quick enough shutter speed. I had to use a wide aperture of f4.5 a shutter speed of 1/25second and ISO set at 100. By doing this it has created something else, a sence of the movement of the leaves is shown and with a few pictures taken I was able to show my daughters face and have the leaves in a blur all around her.
The above photo was taken at 7.10pm as the sun was begining to set. I used a small apature of f13 coupled with shutter speed of 1/6 sec to try andshow the back ground in focus. This has worked slightly as it is not a complete blur in the backgound I think I was to close to the subject for it to work properly.
Below I shot this scene with the intention of framing my daughter with the natural opening of the setting , with the foregound and the trees around her.I hoped to capture a sense of her owning the surroundings a feeling of her being in charge. The light wasn't the best but there was enough.  I'm pleased with my daughter's expression but feel the background let the image down as the colours have faded away.
Below I asked my daughter not to smile but to just look out over the scene and try to look serious. This took a few takes as she kept smiling and moving around.


Sunday Sunrise...

On the morning of the 16th of October at  5am my alarm awoke me. I got up threw my curtains open hoping to see stars in the night sky , I wasn't dissapointed . Myself and 3 others colleges friends had arranged to meet at Hilton Gravel Pits a nature reserve near to Derby to try and capture the sunrise. We meet at 6.30am and after a short walk we were set up on the east of a pond so facing west to get the sun rising over some trees which lined the pond. I took some test shots which I will show untill I felt I had aboout the right settings. The sun was due to rise at around 7.30am but whilst waiting so not to waste what little time we had arragend we started takiing shots of the pond and the sky above .All pictures were taken with myNikon D3100 with it's standard lens and my tripod was used.
Health and Safety ; as there was five of us and we were setting up before the sun rise so the light was poor we had to be careful not to get in each others way with ourselves and our equipment. 

The shot above was taken at 7.30am just as the sun had started to rise . I set my camera to 100 ISO to try and get the best image possible but buy doing this I knew I'd have to use a slower shutter speed so my tripod was used. I composed this image to try and draw the eye to the left of the image to see firstly the colours in the sky then thier reflection on the still water.I did this by framing the shot with the over hanging trees, this also helped to obscure the grey sky to the right. This was shot with as small apeture of F14 coulped with a shutter speed of 1/6th of a second .

Shutter speed 1sec, Apeture f20, ISO 100
This image to the right was a chance image taken whilst waiting for the sun to rise . I like the texture shown at the bottom where the twigs and leaves form a base to the image then the eye is drawn by the twigs to the top right to then show the reflection of the sky and the over hanging trees.
Shutter speed 1/10sec , f22 100 ISO
I was at first not pleased with this image as I had wanted a stronger view of the sun rising through the trees but looking again was pleased with the warmth shown around the top of the trees and the reflection in water of the trees and the ripples give the viewer a good starting point which then leads to sun reflection which leads to the mist which gives a break to the top of the image.


Shutter speed 1/15sec , f22 100 ISO
Shutter speed 1/30sec , f16 100 ISO


Shutter speed 1/20sec, f25  100 ISOShutter speed 1/5sec, f7.1 100ISO

Thursday, 6 October 2011

Studio Time 06/11/10

Today we visited the colleges studio facility. We were shown some of  the equipment the college have in stock and Steve talked us through the camera operations . We talked about the three main settings of the camera, firstly the ISO setting which is set by the International Standards Organisation who rate the film speed used in a camera. The setting of  the ISO on the camera we used in this case a Canon 5D has a range from 50 to 3200, so is capable of reacting to very low light,  moon light or street lights to capture an image . The problems that will arise through using the higher rated speed, or fast film is that your image will not be as sharp as if you had chosen a lower rated or slower film setting .As the higher the ISO used the less light is required to process so your image , so will not be given the time to give a real sharp image and will show a noisy or grainy look to them.So using a low setting of 100 or 200 will always give a sharper image . We secondly talked about the stutter speed and as we were using as lamp with a flash built in we could only choose a speed of 1/200th of a second or slower as the camera had to be in time with the lamp giving of its flash of light. The lamp's flash was controlled by the camera via a cable joining the two.The shutter speed dictates the length of time the camera's digital sensor is exposed to the light it has to read. The higher speeds would be used to capture fast moving objects, for use in sport and in windy conditions as so not to produce a blurred image. Slower speeds will need to be used in low light condition for example indoors . Thirdly is the Aperture setting ,this is controlled by adjusting the 'f' stops of the camera's lens.By doing this you can dictates how large or small the hole, known as the aperture in the camera's lens, will allow the light to hit the sensor or film used in it. The higher the 'f' stop number used the larger aperture will be and the smaller the 'f' stop number used the larger the aperture will be .By using the higher 'f' stop your image will show focus in both the fore ground and background in your image used for example to landscape photography.When the lower 'f' stop number used this will show the image in the foreground in focus but the back ground will be a blur, good for use in  portraits so your subject is the main focal point for the viewer of your picture. The adjusting of the aperture will also dictate the speed of the shutter you will need to use. The small the aperture the the longer the shutter will need to be open to let enough light in to have the picture correctly exposed. Below shows a picture shot with a high shutter speed which you can see was able to catch the water in mid air.
Above shows another shot of water but this time with the shutter speed slowed down to give a sense of movement in the image.
Here we can a range of different 'f' stops , showing the apertures relating to them.The larger the aperture the smaller the number.
And lastly above shows an on line calculator which can be used to calculate the correct shutter speed and aperture to be used in different light conditions.This gives a range of light conditions to choose from.I will be posting some picture using this to web site to calculate all three setting to see if  accurate.